- My Forums
- Tiger Rant
- LSU Recruiting
- SEC Rant
- Saints Talk
- Pelicans Talk
- More Sports Board
- Fantasy Sports
- Golf Board
- Soccer Board
- O-T Lounge
- Tech Board
- Home/Garden Board
- Outdoor Board
- Health/Fitness Board
- Movie/TV Board
- Book Board
- Music Board
- Political Talk
- Money Talk
- Fark Board
- Gaming Board
- Travel Board
- Food/Drink Board
- Ticket Exchange
- TD Help Board
Customize My Forums- View All Forums
- Show Left Links
- Topic Sort Options
- Trending Topics
- Recent Topics
- Active Topics
Started By
Message
Plumbing Help. Toilet Flange
Posted on 12/15/24 at 6:49 am
Posted on 12/15/24 at 6:49 am
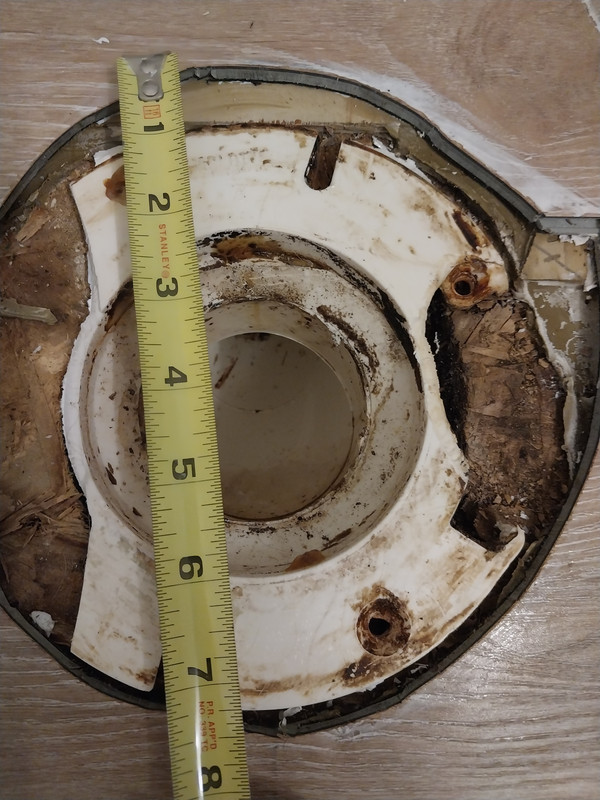
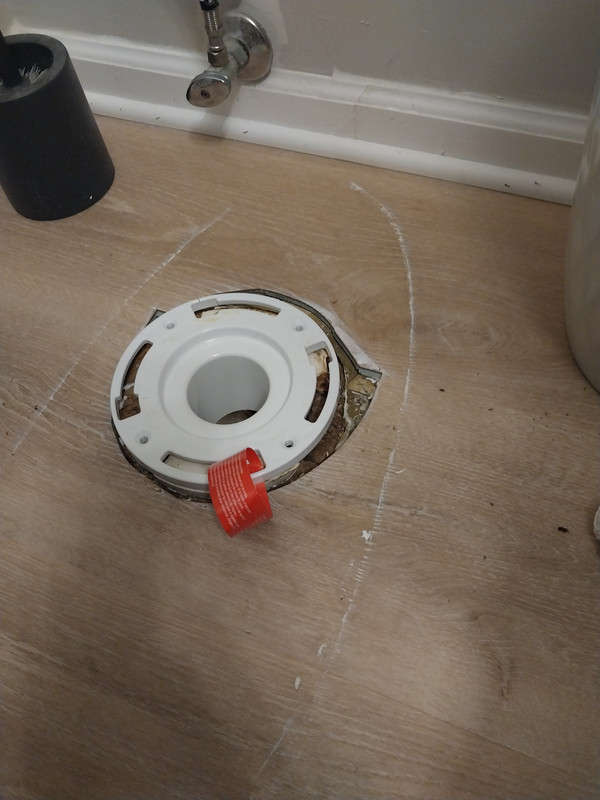
Had a cracked toilet flange, and unfortunately the damage was beyond just installing a repair flange over it. The flange was a 3" over the pipe setup, however it was glued onto a 90. I was told you cannot replace the flange the way it was. With the PVC 90 being over a drywall ceiling in the basement, a plumber friend suggested I get an inside flange to go inside my existing flange. The new opening is 2.5", and he said the discharge from the toilet is 2" anyways so should not be an issue.
Well one week later, the toilet is not flushing well at all. Very slow and week. Is the discharge being restricted by the narrow opening? Am I basically going to have to replace the the entire 90 and everything?
90 with existing flange glued over
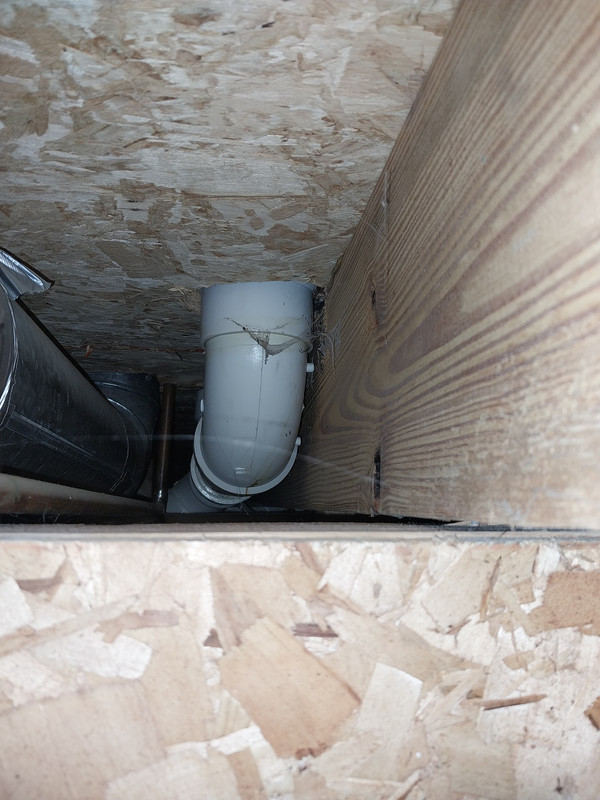
Existing flange
New flange glued inside existing flange
Well one week later, the toilet is not flushing well at all. Very slow and week. Is the discharge being restricted by the narrow opening? Am I basically going to have to replace the the entire 90 and everything?
90 with existing flange glued over
Existing flange
New flange glued inside existing flange
This post was edited on 12/15/24 at 7:56 am
 4
4


Posted on 12/15/24 at 7:25 am to burger bearcat
A 2" flange seems restrictive to me. What is going on in the bowl when it flushes? Is anything emptying out at all?
Posted on 12/15/24 at 7:50 am to potent357
quote:
A 2" flange seems restrictive to me. What is going on in the bowl when it flushes? Is anything emptying out at all?
It's a 2.5 inch flange opening. They call it a 3 inch inside flange (glues inside the pipe).
At the time I posted it, the tank would empty, fill the bowl, then slowly drain. It would push through, just slowly.
But since then, ans a little update after making some tweaks this morning. I raised the water level inside the tank, tightened the chain flapper a few links, ran some drain cleaner through it, and then ran a toilet auger through it. For the time being it is now flushing fine.
I'm still thinking the narrow discharge is creating some issue, possible a syphon or venting issue, I'm not sure. But if this doesn't work, I may be stuck ripping out drywall and replacing the PVC pipe underneath to install a wider flange.
This post was edited on 12/15/24 at 7:52 am
Posted on 12/15/24 at 7:58 am to burger bearcat
What was going on that lead to you removing the toilet to find a cracked flange in the first place? Was the toilet flushing okay then?

Posted on 12/15/24 at 7:59 am to burger bearcat
quote:
venting issue
That was my first thought while looking at the photo. Hopefully, there is a vent downstream that is not shown.
Was this toilet an add-on later after the build was complete?
Posted on 12/15/24 at 8:09 am to potent357
quote:
What was going on that lead to you removing the toilet to find a cracked flange in the first place? Was the toilet flushing okay then?
It was a leak. Because of the cracked flange. I could have originally fixed the flange with a repair kit, but I was trying to remove the flange and did not realize it was glued straight to the 90 until it was too late. At that point the flange was damaged beyond repair kit.
But the toilet seemed to be flushing ok otherwise. Just nasty water seepingat the base of the China.
Posted on 12/15/24 at 8:10 am to 2 Jugs
quote:
That was my first thought while looking at the photo. Hopefully, there is a vent downstream that is not shown
There is a vent stack just a few feet downstream from the 90. So it's definitely vented, and this was part of the original build 30 some years ago.
Posted on 12/15/24 at 8:53 am to burger bearcat
Being at a dead end like that, makes me think it had a build up somewhere.

Posted on 12/15/24 at 11:29 am to burger bearcat
I'm going to advise you stop what you are doing now and start getting the proper tools to fix this right.
First buy this.

And this one:
https://www.acmetools.com/reed-mfg-plastic-pipe-fitting-reamer-2-1-2in-04532/757033045323.html?gad_source=1&gclid=CjwKCAiAmfq6BhAsEiwAX1jsZw0ls7HtnlU-5toycjleMbTYtZ8MM32d2BMD-k4ESXXn7C7Ahzj0MhoCjGEQAvD_BwE
This has a pilot step so it is self guiding and the carbide cutter just clears to the ID of the coupling to the elbow so you won't have a problem with glueing in a new flange. This picture just shows the relationship of the reamer to what it will be cutting out.

Then chuck it up in a strong 1/2" corded or cordless drill. Stuff some rags or a grout sponge into the elbow to stop the pvc chips from going down the drain and use that tool to cut out the existing flange. You'll be able to glue in a new flange to the proper height with the floor with no issues after you get the mess cleaned up. If you are careful, do not push down hard or force the reamer it will cut just fine without much effort from you, you can make this a pretty easy fix and then tell your plumber friend he owes you a good bottle of bourbon for suggesting that insert flange crap.
That's a crappy situation with the old flange, I understand why it was suggested to use that insert flange but it's not impossible to fix the original setup and now it's going to be a bit more expensive and time consuming to effect a good repair.
First buy this.
And this one:
https://www.acmetools.com/reed-mfg-plastic-pipe-fitting-reamer-2-1-2in-04532/757033045323.html?gad_source=1&gclid=CjwKCAiAmfq6BhAsEiwAX1jsZw0ls7HtnlU-5toycjleMbTYtZ8MM32d2BMD-k4ESXXn7C7Ahzj0MhoCjGEQAvD_BwE
This has a pilot step so it is self guiding and the carbide cutter just clears to the ID of the coupling to the elbow so you won't have a problem with glueing in a new flange. This picture just shows the relationship of the reamer to what it will be cutting out.
Then chuck it up in a strong 1/2" corded or cordless drill. Stuff some rags or a grout sponge into the elbow to stop the pvc chips from going down the drain and use that tool to cut out the existing flange. You'll be able to glue in a new flange to the proper height with the floor with no issues after you get the mess cleaned up. If you are careful, do not push down hard or force the reamer it will cut just fine without much effort from you, you can make this a pretty easy fix and then tell your plumber friend he owes you a good bottle of bourbon for suggesting that insert flange crap.
That's a crappy situation with the old flange, I understand why it was suggested to use that insert flange but it's not impossible to fix the original setup and now it's going to be a bit more expensive and time consuming to effect a good repair.
This post was edited on 12/15/24 at 11:46 am
Posted on 12/15/24 at 2:12 pm to burger bearcat
If its working, then I might just leave it be. Though I might pull the toilet in about 6mo and make sure there isn't wet wood from any leaks around the wax. Also pay attention to the ceiling underneath for any water-spots. The smaller opening might be a problem because it could cause water to "stack up" in the wax ring area and wax rings are for odors and not for sealing water.
Really the flange should sit above the finished floor about 1/4"-3/8". This way the ceramic horn on the bottom of the toilet sits inside/ and into the pvc toilet flange. Many flanges end up sitting even or below the finished foor and people just use extra thick wax rings to try and channel the water into the flange. It usually works for a while but eventually water will find its way outside of the wax ring and start making a mess.
With the way your flange sits over a street 90 (a 90 with only one bell-end) A reamer unfortunately isn't going to do you any good. It would only help on a 4" pipe which the flange sits into, not a 3" pipe that the flange sits over.
Though I am bit confused with the pics as the first one from below shows clearly a flange that sits over but the second of the broken flange seems to not show a sit-over flange. Usually you can see the edge of the 3"pipe protruding inside the flange with a sit-over variety. Could be just some setup I haven't seen before though.
The only sure fix I can think of is to do the worst thing in the world and cut a hole in the ceiling and fix from below. Then you'd be able to cut out the offending 90 and also make it so the flange sits properly on top of the floor.
Posted on 12/18/24 at 6:27 pm to burger bearcat
Did you use a wax ring with a horn or a standard wax ring? With those smaller flanges you cannot use the wax rings with the horns.
Posted on 1/4/25 at 7:34 am to Pondyrosa
quote:
Did you use a wax ring with a horn or a standard wax ring? With those smaller flanges you cannot use the wax rings with the horns.
No horn. Wax only
Posted on 1/4/25 at 7:36 am to Clames
quote:
First buy this.
With the flange being an outside the 90 mount, the reamer unfortunately wouldn't do me any good. However I definitely need to add a flange reamer kit to my tool inventory.
As if now it is working. But a little temperamental and finicky with needing to adjust the ta k pressure, etc

 Page 1 of 1


Popular
Back to top